How to do a big project! (hint: spreadsheets! wtf?!)
Hi everyone,
I thought I might start adding to my blog again and give you guys an inside look at some of the things I’m working.on. I’ll be posting a lot of process work as well as some video links and other goodies along the way. I’ll be doing these kinds of posts on the first of the month every month from now on.
So let’s jump right in!
The topic I’ll be exploring first is: How to manage a big project! We all have big aspirations when it comes to big projects. Things like children’s books, graphic novels, board games, etc. are all SUPER FUN! But, they can become overwhelming QUICK! Just staying organized and moving the project forward is tricky. Many people get about halfway and just give up because they haven’t planned it out well enough. It’s sort of funny that art school has so many classes on how to paint and draw, but really nothing on how to finish a big project! So I’m going to give you some tips and tricks here that you can hopefully use right away!
I’ll be using my Tarot Deck project as my example.

Project: The Wandering Moon Tarot
This Project consists of doing 22 different cards (called The Major Arcana). I’ll be doing the rest of the deck at a later date. Starting this project was tricky for me because I didn’t know anything about tarot decks, so I needed a way to get me on track and organize the information into something I could work with. Since these cards don’t have a main character or story like I’m used to illustrating, setting this project up right was very important.
So what’s the big secret to organizing a project? I’m going to give you a little tip that will change your life. That tip is:
Spread sheets! YAY! (WAIT WHAT?!)
Now I know what you are thinking. Why is he talking about a spread sheet?! I’m an artist for crying out loud! Not a CPA! But hear me out. The key to doing a BIG PROJECT is to have all the information available for you to see ALL AT ONCE. This is the key! And I’m going to show you how to do it (or at least how I did it!). I have a few tips that I think will show exactly why this method is so helpful!
Before I show you my version, I thought I’d mention that a lot of people (illustrators included) use a basic color coded spread sheet as a scheduler that shows how many pages have been done and what stage each image is at. This is somewhat effective, but the way I do it is more helpful to illustrator specifically (Making a better project!). This basic method can look something like this (this is from my online illustration school. It’s how we keep track of where a class is in production). :

This method works reasonably well in that you can list the things you need to accomplish and color code the different stages you might be at. For illustrators you may have the Sketch stage be one color and color studies be another, etc. Here’s an example of that (used with permission of Jake Parker):. He fills in the boxes with different colors and then pastes the finished sketches on the page.

This method works great, but I wanted something that added in the early stages of the work so it can help the overall project move forward. I call my method the VISUAL SPREADSHEET which stores much more data that we can use to make our projects better. Here are the categories that I am using for my Tarot deck (I’m building my spreadsheets in Microsoft Onenote, but Excel or Numbers works fine too):

This happens to be for a Tarot deck, but you could use this format for almost anything. The big difference between this method and the other one I showed above will become clear as you see it populated. The biggest thing that I want to emphasize here is that you fill the boxes with IMAGES and not just colors or text. This is MASSIVELY IMPORTANT when working on a big project. Here’s what a row might look like for my project:

As you can see, I have categories for the what the MEANING I’m trying to convey, This helps me make sure I know that the overall feel for each page should be. For a picture book, I’d list what I want the viewer to feel when looking at that page. Then a space for keywords which is what i really use for brain storming my sketches, etc. I have a category for any icons or symbols that might be important to the image. Next in line I have a place for references (in this case I add the basic tarot card from the base set that most people who use tarot decks are familiar with). Then I have thumbnail sketches, Rough sketches, Final Sketch, and the finished painting. For this particular card I went from the rough sketch right to the finished painting because I could already see what it was going to look like in my head. If it’s a tricky image, I will do a final sketch to make sure I understand how it’s all going to come together. Here’s the finished card if you want to see. Note: My post on Nov. 1 will show a ton of the development of this project):

The real benefit from working this way comes once you get into the project and have a lot of information in the spread sheet. Being able to see all the stages of the project really helps you decide which image to use. NOTE: I typically work up the thumbnail sketches and rough sketch stage for ALL the images first so I can see them all next to each other. Then I can make changes if one is too similar to another or whatever problem might arise. The hard part about doing a BIG PROJECT is all the images need to work as a group. In a picture book this is massively important. The whole is dependent on all the parts working together. And by seeing all the parts together, it can help inform WHICH ROUGH SKETCH TO PICK? (this is a very difficult thing to do the bigger a project gets). Below you will see what it looks like when I have many of the tables populated: I know you can’t make out most of this information because it’s too small on the screen, but what I want to emphasize about this method is that I can see the PROCESS of each card in relation to the whole. I continually adjust the rough sketches as the project moves along.

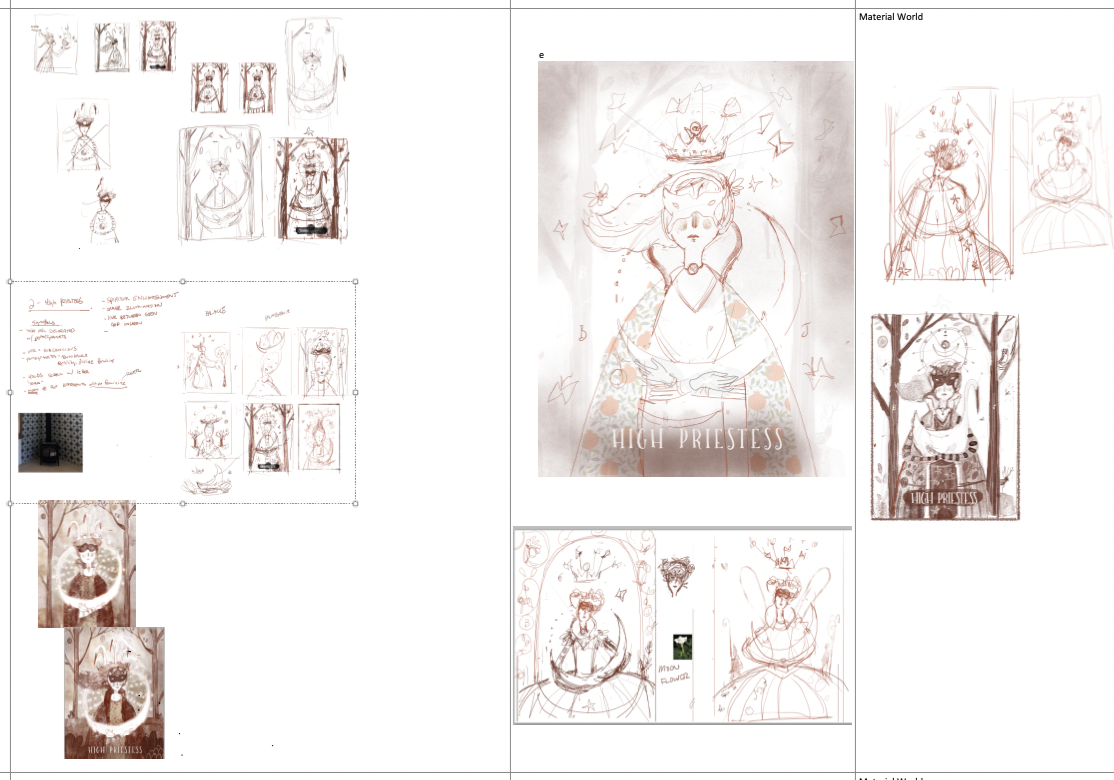
Here’s a little closer look at what the rough sketches look like. I zoom in like this and can scroll through the whole project to see all the options from all the thumbnails I’ve done! : )
I know It’s a little bit different way of working, but it sure does keep it all organized. I love looking through the rough sketches when I get stuck on a new image I need to do. Sometimes I can rework a sketch that I have already done and fit it to the new thing I need to do! So if you have never tried organizing a project this way, I encourage you to give it a try.
Thanks for taking the time to look at this info and I hope you found it helpful in some way. : )